
What and Why
If you teach or manage a self-paced Canvas course, you already know the rhythm: check in on students, figure out who’s falling behind, write them a message, repeat. When it’s five students, that’s manageable. When it’s thirty or sixty spread across multiple sections, the checking and the writing start eating into everything else you need to do. And if you’re also supposed to be keeping parents or guardians in the loop, that’s another layer entirely.
Canvas Auto Pacer is a Google Sheets tool that connects to your Canvas instance, compares student submissions against the assignments you’d expect them to have done by now, and flags anyone who’s behind. From there, it uses the Claude API to draft personalized check-in messages for each student based on their actual progress, not a generic template. You review and edit every message before anything gets sent. When you hit send, the messages go through Canvas Inbox, so students see them where they’re already looking.
It also handles observer notifications. If parents or guardians are linked as observers in Canvas, the tool can send them a separate, template-based progress update alongside the student message. That template lives in the config sheet, so you control the wording.
A few things this tool intentionally does not do: it doesn’t grade anything, it doesn’t set due dates, and it doesn’t automate sending without your review. Every message passes through you before it reaches a student. The AI drafts are a starting point, not a finished product. You can rewrite them entirely, and you should whenever the draft doesn’t sound like you.
You’ll need a Google Workspace account, a Canvas API token with appropriate permissions, and a Claude API key from Anthropic. The Claude API does have usage costs (though they’re small for this kind of use), so this isn’t a completely free tool to run. If you don’t have or don’t want a Claude API key, you can still use the pace-checking portion and write your own messages manually.
Quick Look
The tool runs as a step-by-step wizard inside a dialog window launched from your Google Sheet. Here’s the general flow:
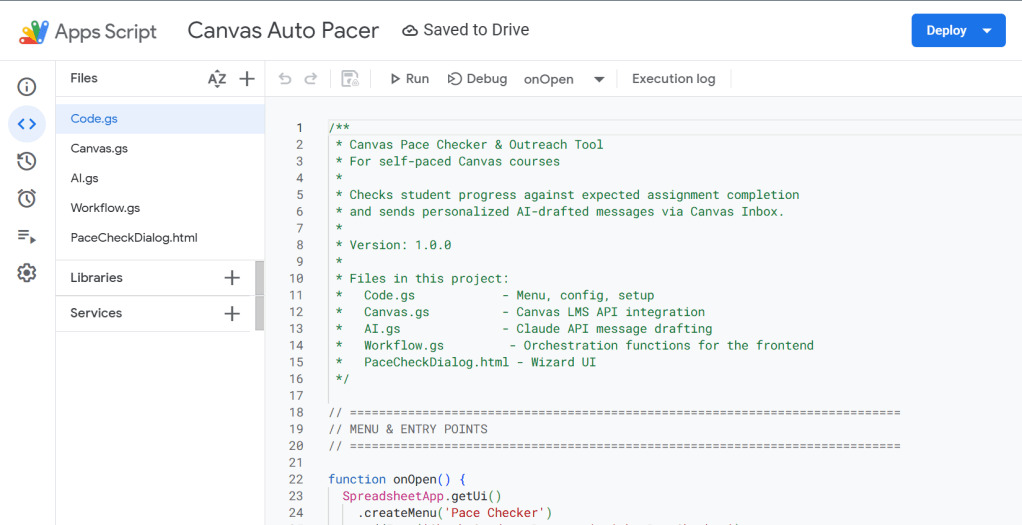
The project lives in five files inside Google Apps Script. You won’t need to touch the code for normal use. Everything you configure happens in the Config sheet.
The wizard walks you through five steps:
- Select your courses from the ones Canvas knows you teach.
- Pick sections within those courses.
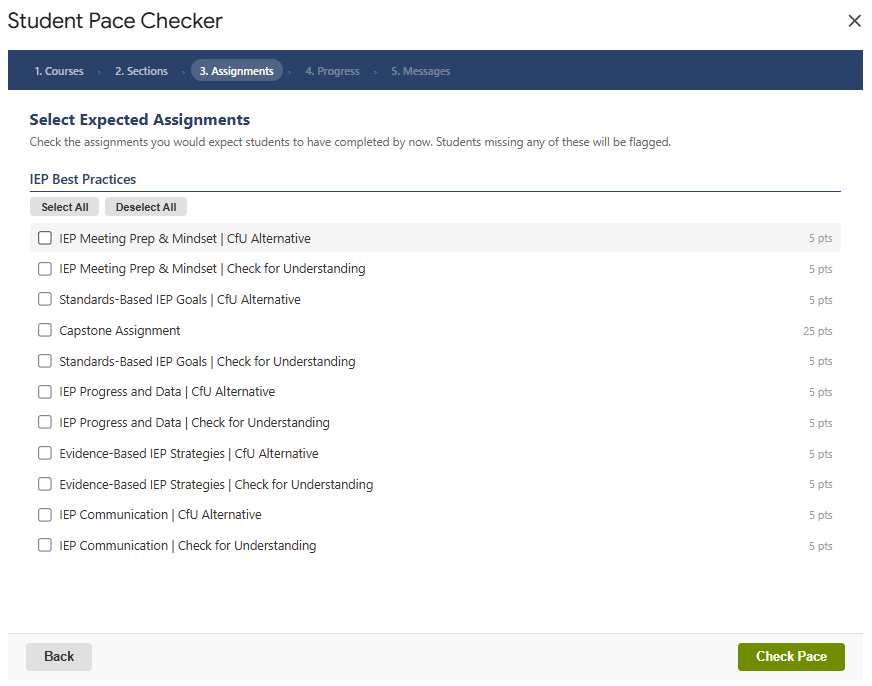
- Check the assignments you’d expect students to have completed by now.
- Review the progress results, a table showing who’s behind and by how much.
- Review AI-drafted messages, edit them, and send through Canvas Inbox.
Get Started
When you click that link, Google will ask you to make a copy to your own Drive. This gives you a completely independent version. Nothing you do in your copy affects the original, and no one else can see your API keys or student data. Your copy is yours.
Once you have your copy open, you’re ready for setup.
Walk Through It With Me
Step 1: Set Up the Config Sheet
From the menu bar in your Google Sheet, go to Pace Checker > Setup Config Sheet. This creates a Config tab with all the fields you need to fill in. If you already see a Config tab, the menu will tell you it exists and let you edit it directly.
Here’s what each field does:
Canvas API Token (Row 2): This is how the tool talks to Canvas on your behalf. To generate one, go to your Canvas account settings (Account > Settings) and scroll down to “Approved Integrations” or “New Access Token.” Give it a name you’ll recognize, like “Auto Pacer,” and copy the token. You’ll only see it once, so paste it into the Config sheet right away.
The token needs permissions for courses, sections, enrollments, submissions, and conversations. If you’re using an institutional Canvas instance, your admin may need to enable API access for your account.
Canvas Base URL (Row 3): Your Canvas address. Something like https://yourschool.instructure.com. No trailing slash needed; the tool handles that.
Claude API Key (Row 4): Your API key from console.anthropic.com. If you don’t have an Anthropic account, you’ll need to create one and add a payment method. For context on cost: drafting messages for a class of 30 students might use a few cents worth of API calls. It’s not zero, but it’s not much.
If you’d rather not use the AI drafting feature, you can leave this field blank. The pace-checking steps will still work. You’ll just write your messages manually in Step 5 instead of editing AI drafts.
Claude Model (Row 5): Defaults to claude-sonnet-4-20250514, which works well for this. You can change it to a different Claude model if you prefer, but the default is a good balance of quality and speed.
System Prompt (Row 6): This tells Claude how to write the student messages. A default is provided that aims for a warm, encouraging, non-formulaic tone. You can and should adjust this to sound more like you. If you tend to be more direct, say so in the prompt. If you want messages to reference specific resources or next steps, include that here.
Default Subject (Row 7): The subject line that appears in Canvas Inbox. Defaults to “Checking In.” You can also change this per batch when you’re in the wizard.
Observer Template (Row 8): The message template for parents and guardians. This uses merge tags like {{studentName}}, {{completedCount}}, {{missingList}}, and so on. The default template is straightforward and factual. Adjust the wording to fit your school’s communication style.
At this point, you should see a Config tab with your credentials filled in and the default prompts visible in the wider cells.
Step 2: Run It for the First Time
Go to Pace Checker > Check Student Progress.
The first time you run any function from the menu, Google will ask you to authorize the script. You’ll see a screen that says something like “This app isn’t verified” with a warning icon. This looks alarming, but it’s normal for any Apps Script project that hasn’t gone through Google’s formal review process. Since you own this copy of the script, you can trust it.
Click Advanced, then Go to Canvas Auto Pacer (unsafe). (The “unsafe” label is Google’s generic warning for unverified scripts, not a reflection of what this particular script does.) Then review the permissions it’s requesting and click Allow.
The permissions include access to your spreadsheet (for config and logging), the ability to make external web requests (to talk to Canvas and Claude), and the ability to show dialog windows (for the wizard interface).
If you already know your way around Apps Script authorization, skip ahead to Step 3.
At this point, you should see the wizard dialog open with Step 1: Select Courses, showing a list of Canvas courses where you’re enrolled as a teacher.
Step 3: Walk Through the Wizard
The wizard is five steps, and each one builds on the last.
Courses: Check the courses you want to look at. You can select more than one if you teach multiple sections of the same self-paced course.
Sections: Choose which sections to include. The tool shows student counts next to each section so you can gauge the scope before proceeding.
Assignments: This is the key step. Check every assignment you would expect a student to have completed by this point in the course. The tool doesn’t know your pacing schedule, so you’re telling it what “on pace” means right now. Students missing any of these checked assignments will be flagged.
Progress: The tool pulls submission data from Canvas and shows you a table of every student who’s behind. You’ll see their name, section, how many of the expected assignments they’ve completed, how many they’re missing, and a progress bar. There’s also a collapsible detail view for each student showing exactly which assignments they haven’t submitted.
If everyone is on pace, you’ll see a message saying so, and there’s nothing more to do.
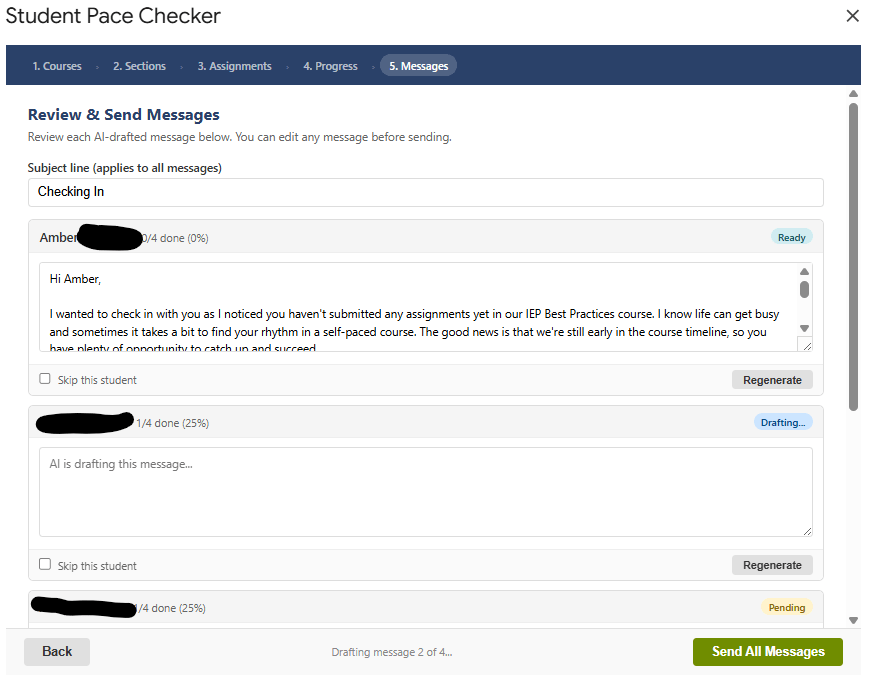
Messages: If students are behind, you move to the drafting step. The tool sends each student’s progress data to Claude one at a time, and you’ll see the messages appear as they’re drafted. Each message shows up in an editable text area, so you can rewrite any of them before sending. You can also skip individual students, regenerate a draft you don’t like, or change the subject line.
If any of your flagged students have observers linked in Canvas, you’ll see an option to send observer notifications as well. That checkbox is on by default but easy to turn off.
When you click Send All Messages, the tool asks you to confirm the count, then sends each message through Canvas Inbox and logs every send (successful or failed) to a Message Log sheet.
At this point, you should see sent messages in your Canvas Inbox sent items and a new Message Log tab in your spreadsheet.
Step 4: Check the Message Log
After sending, go to Pace Checker > View Message Log or just click on the Message Log tab. Every message gets a row with the timestamp, course, section, student name, recipient type (student or observer), subject, a preview of the message, and whether it sent successfully or failed.
If any messages failed, the status column will tell you why. Common reasons include an expired Canvas token or a student enrollment that changed between the pace check and the send.
Common First-Run Hiccups
“No response from server”: Usually means the Canvas API token is missing or incorrect. Double-check that you pasted the full token into the Config sheet with no extra spaces.
“Canvas API error (401)”: Your token is invalid or expired. Generate a new one in Canvas.
“Canvas API error (403)”: Your token doesn’t have the right permissions, or your Canvas admin has restricted API access. Talk to your Canvas admin.
Wizard loads but shows no courses: Make sure you’re enrolled as a Teacher (not a TA or Designer) in at least one published course.
Claude drafting fails: Check that your Claude API key is correct and that your account has available credits. The error message in the draft area will usually point you in the right direction.
Messages send but don’t appear in student inboxes: Canvas sometimes takes a few minutes to deliver conversation messages. If they still don’t appear after 10 minutes, check whether your Canvas instance has any messaging restrictions enabled.
Make It Yours
If you got through a successful run, that’s the win. Everything from here is optional and can happen on your own timeline.
Safe to Tweak
System Prompt: This is the most impactful thing to customize. The default prompt produces decent messages, but they’ll sound more like you if the prompt reflects your actual communication style. Experiment with different instructions. Tell it to mention specific resources, reference your office hours, or match a particular tone. You can always regenerate drafts to see how your changes affect the output.
Observer Template: Adjust the wording, add or remove merge tags, or restructure the format entirely. The available merge tags are: {{studentName}}, {{firstName}}, {{courseName}}, {{completedCount}}, {{expectedCount}}, {{missingCount}}, {{totalCourseAssignments}}, {{completionPercent}}, {{missingList}}, and {{completedList}}.
Default Subject Line: Change it in the Config sheet, or change it per batch in the wizard. Whatever makes sense for your context.
Claude Model: If you have access to different Claude models and want to experiment with quality or cost tradeoffs, you can change this. The default model handles this task well.
If You Want to Go Further
The code is organized into separate files by function: Canvas API calls, AI drafting, workflow logic, and the dialog interface. If you’re comfortable with Apps Script and want to modify behavior, each file has comments explaining what it does and why. A few ideas people have asked about:
You could adjust the submission logic in Workflow.gs to consider graded status rather than just whether something was submitted. The current check treats any submission (regardless of score) as “completed,” which may not match how you define progress.
You could also modify the pace-check logic to include date-based thresholds rather than manually selecting assignments each time. That would require adding a pacing schedule to the Config sheet and some changes to how the wizard’s Step 3 works.
These are the kinds of changes that go beyond “safe to tweak,” so make a backup copy of your sheet before experimenting with the script itself.
Connect and Continue
I built this because I was spending too much time on the manual version of this workflow, checking submissions, writing individual messages, copying and pasting progress updates for parents, and I figured other people running self-paced courses were probably doing the same thing. It’s not perfect, and I’d be the first to tell you there are things I’d do differently if I were starting over. But it works, and it saves me real time on something that matters.
If you run into issues, have questions about setup, or have ideas for how this could work better, I’d genuinely like to hear from you. Reach out at licht.education@gmail.com.
Version 1.0.0

Leave a comment