
Version: 1.0.0
What and Why
If you’ve ever managed a program, a department, or really any group of people with questions, you know the pattern. The same questions come in over and over again, through email, through Slack, through someone stopping you in the hallway. You answer them patiently because that’s the job, but you also know that time adds up. And you know that somewhere, buried in a shared drive or a handbook nobody reads, the answers already exist.
This tool is a FAQ chatbot built entirely in Google Sheets and Apps Script. You populate a spreadsheet with your frequently asked questions and answers, adjust a few settings, and deploy it as a small web app that people can actually use. It handles the repetitive stuff so you can focus on the questions that genuinely need a human.
The chatbot uses what I’m calling a hybrid strategy. It tries keyword matching first, looking for overlap between what someone types and the FAQ entries you’ve written. If the match is strong enough, it serves that answer directly with no API call, no cost, no delay. If the match isn’t confident enough and you’ve added an AI API key, it falls back to Claude to generate a response grounded in your FAQ content. If you don’t add an API key at all, it works purely on keyword matching, which is a perfectly fine starting point.
It’s designed for anyone running a help desk, support channel, onboarding process, or resource hub where the same information gets requested repeatedly. Think school districts answering parent questions about enrollment, co-ops fielding member inquiries, or training teams handling “how do I…” questions during a new platform rollout.
A few things this tool intentionally does not do: it won’t crawl your website for answers, it won’t connect to external databases, and it won’t replace a full customer support platform. It answers the questions you teach it to answer, and it tells people to email you when it can’t help. That’s the scope, and it’s honest about it. You’ll need a Google Workspace account (or a personal Google account) to run it, and the AI fallback requires an Anthropic API key if you want that layer.
Quick Look
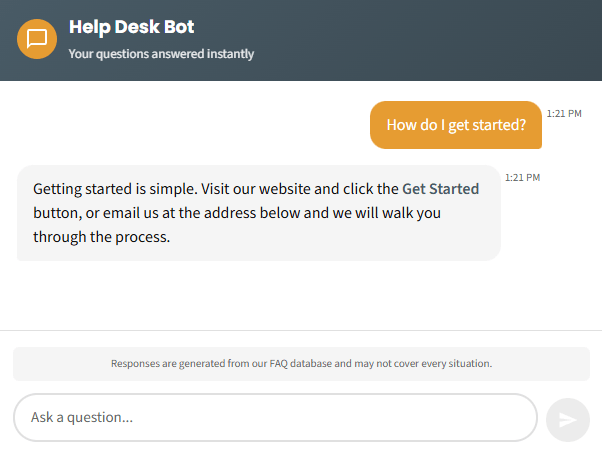
The chatbot runs as a clean, mobile-friendly web app that you embed wherever you need it. The entire configuration lives in a single Google Sheet with five tabs.
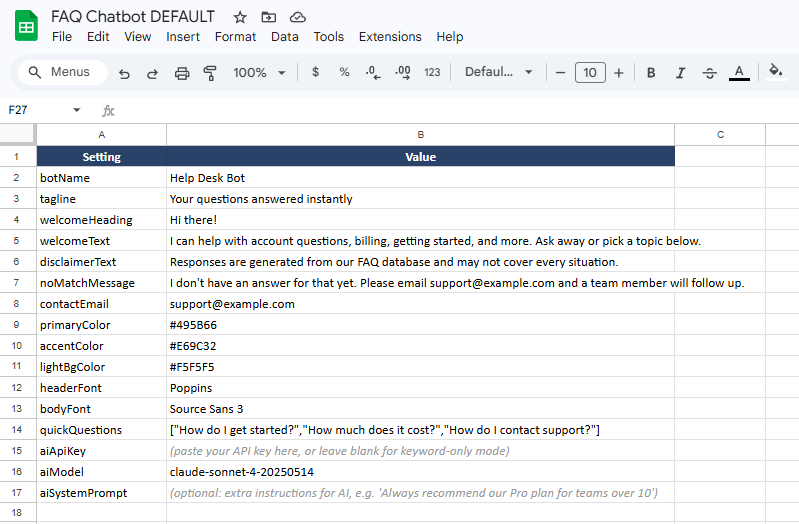
The Settings tab is where you control everything visible to the user: the bot’s name, colors, fonts, welcome message, quick-start questions, and the optional AI key. No code editing required for any of this.
The FAQ_Data tab is where your actual content lives. Each row is one question-answer pair with associated keywords and an optional category. The more specific your keywords are, the better the keyword matching performs before it ever needs to call the AI.
The chatbot interface itself adapts to whatever branding you set in the Settings tab. It supports quick-start question buttons, conversation history within a session, and markdown-style formatting in responses (bold text and links).
Get Started
Step 1: Make a copy of the template spreadsheet.
When you click that link, Google will ask you to make a copy. This gives you your own independent version of the spreadsheet, including all five tabs and the Apps Script code attached to it. Nothing you do in your copy affects the original, and nothing changes in the original affect yours. It’s completely yours from this point forward.
If you already know how Google’s “Make a Copy” works, skip ahead to Step 2.
For everyone else: after you click the link, you’ll see a dialog that says “Copy document.” You can rename it here if you want (something like “Our Team FAQ Chatbot” works well). Hit “Make a copy” and you’ll land in your own spreadsheet. You should see five tabs along the bottom: Settings, Logs, Sessions, FAQ_Data, and Resource_Guides.
At this point, you should see a spreadsheet that looks like the Settings screenshot above, with example values already filled in.
Walk Through It With Me
Step 2: Update the Settings tab
This is where the chatbot gets its personality. Open the Settings tab and work through the rows. Here’s what each one does:
- botName — The name displayed in the chatbot header. Change “Help Desk Bot” to whatever fits your context.
- tagline — The short line under the bot name. Keep it brief and descriptive.
- welcomeHeading — The greeting users see when they first open the chatbot.
- welcomeText — A sentence or two explaining what the chatbot can help with. This is your chance to set expectations clearly.
- disclaimerText — The small text above the input field. Be honest about what the chatbot can and can’t do. The default works fine to start with.
- noMatchMessage — What the chatbot says when it can’t find an answer. I’d recommend including your contact email here so people know where to go next.
- contactEmail — Your support email. This shows up in fallback messages.
- primaryColor and accentColor — Hex color codes for the header background and buttons/highlights. If your organization has brand colors, use them here. If you’re not sure what your hex codes are, a quick search for “color picker” will get you there.
- lightBgColor — The background color for bot message bubbles. The default light gray (#F5F5F5) works well for most setups.
- headerFont and bodyFont — Google Fonts names. The defaults (Poppins and Source Sans 3) are solid choices, but if your organization uses specific fonts, you can swap them in. Just make sure the font name matches exactly what Google Fonts calls it.
- quickQuestions — A JSON array of starter questions that show as clickable buttons on the welcome screen. Format them like this:
["Question one?","Question two?","Question three?"]. These are worth spending time on because they guide people toward the questions your chatbot actually knows how to answer well. - aiApiKey — Your Anthropic API key, if you want the AI fallback layer. Leave this blank to run in keyword-only mode. Both approaches work. I’d actually recommend starting without the API key so you can see how your keyword matching performs on its own first.
- aiModel — The Claude model to use. The default (
claude-sonnet-4-20250514) is a good balance of speed and quality. You can leave this as-is unless you have a specific reason to change it. - aiSystemPrompt — Optional extra instructions for the AI. If you want Claude to always recommend a specific resource, maintain a particular tone, or avoid certain topics, add those instructions here. This gets appended to the system prompt the chatbot sends with each AI request.
At this point, your Settings tab should have your organization’s name, colors, and contact info filled in. The chatbot won’t look like the example anymore; it’ll look like yours.
Step 3: Add your FAQ content
Open the FAQ_Data tab. You’ll see columns for ID, Question, Answer, Keywords, Category, and Links.
Start with the five or ten questions you get asked most often. For each one:
- Give it a simple ID (FAQ001, FAQ002, etc.)
- Write the question the way a real person would ask it, not the way a policy document would phrase it
- Write the answer in plain, conversational language. You can use
**bold**for emphasis and[link text](URL)for links, and the chatbot will render them properly - Add keywords separated by commas. Think about the different ways someone might phrase this question. If the question is about enrollment deadlines, your keywords might be:
enroll, enrollment, deadline, sign up, register, registration, when - Assign a category if it helps you stay organized (it doesn’t affect the chatbot’s behavior, just your own sanity)
- The Links column accepts JSON format if you want to attach resource links:
[{"text":"Link Name","url":"https://..."}]
The keyword column is where you’ll spend the most thought, and that’s by design. The better your keywords are, the more often the chatbot can serve answers instantly without needing an AI call. I found that including both formal terms and casual phrasing makes a real difference. People don’t always use the words you’d expect.
If you have resource guides or longer documents you want the chatbot to reference, add those to the Resource_Guides tab. Same idea: topic, title, URL, and keywords.
At this point, you should have at least a handful of FAQ entries populated. That’s enough to test with.
Step 4: Deploy as a web app
This is the part that might feel unfamiliar if you haven’t deployed an Apps Script project before, and that’s completely normal. Here’s what to do:
- In your spreadsheet, go to Extensions > Apps Script. This opens the script editor in a new tab. You should see two files on the left:
Code.gsandChatbotUI.html. You don’t need to edit either of these. - Click the blue Deploy button in the top right, then select New deployment.
- Next to “Select type,” click the gear icon and choose Web app.
- Give it a description (something like “FAQ Chatbot v1”).
- Set “Execute as” to Me.
- Set “Who has access” to Anyone. This means anyone with the link can use the chatbot, but they can’t see or edit your spreadsheet.
- Click Deploy.
- Google will ask you to authorize the script. It needs permission to read your spreadsheet data and make external web requests (for the AI fallback, if you’re using it). Click through the authorization prompts. If you see a “This app isn’t verified” warning, click “Advanced” and then “Go to [your project name].” This warning shows up because it’s a personal script, not because anything is wrong.
- After authorization, you’ll get a URL. That’s your chatbot. Open it in a new tab to test.
At this point, you should see your chatbot with your branding, your welcome message, and your quick-start questions. Click one of them. If you set up your FAQ_Data correctly, you should get a real answer back.
Step 5: Test and check the logs
After you’ve sent a few test messages, go back to your spreadsheet and check the Logs tab. You should see entries for each query, including whether it was handled by keyword matching, AI, or the fallback message. The Sessions tab will show your active test session.
This logging is one of the parts I find most useful long-term. It tells you what people are actually asking, which questions your keyword matching handles well, and where the gaps are. That’s the information you need to keep improving your FAQ content over time.
If a query isn’t matching when you think it should, look at your keywords. Usually the fix is adding a term you didn’t think of, or broadening a keyword that’s too specific. The matching algorithm scores based on how many keywords overlap with the query, with bonuses for multiple keyword matches and partial word overlaps. You don’t need to understand the math, but knowing that more relevant keywords generally means better matching is worth keeping in mind.
Make It Yours
If you’ve gotten this far, your chatbot is running. That’s the win. Everything from here is incremental, and none of it is urgent.
Safe to change anytime:
- Any value in the Settings tab. Colors, fonts, messages, quick questions, all of it. Changes take effect the next time someone loads the chatbot.
- FAQ_Data and Resource_Guides content. Add, edit, or remove entries whenever you want. The chatbot reads from the sheet on every query, so new content is immediately available.
- The noMatchMessage and disclaimerText. As you learn what people are asking and where they’re getting stuck, refine these.
Worth exploring once you’re comfortable:
- Adding the AI key. If you started in keyword-only mode, adding an Anthropic API key unlocks the fallback layer. The chatbot will still try keyword matching first, so your API costs stay low. The AI only gets called when keyword matching isn’t confident enough.
- Tuning the quick questions. After you’ve looked at your logs for a while, you’ll have a much better sense of what people actually want to know first. Update the quickQuestions setting to reflect that.
- Embedding the chatbot. The deployment URL works in an iframe, so you can embed it on a webpage, in a Canvas LMS page, or anywhere that supports embedded content. The chatbot is designed to fill its container, so it adapts to whatever space you give it.
- Setting up session cleanup. The script includes a
cleanupOldSessionsfunction that removes sessions older than 24 hours. You can set this up as a daily time-based trigger in the Apps Script editor (Triggers > Add Trigger > cleanupOldSessions > Time-driven > Day timer). This keeps your Sessions tab from growing indefinitely.
If you want to go further:
The aiSystemPrompt setting in the Settings tab is surprisingly powerful. You can use it to shape the AI’s personality, constrain its responses to specific topics, or direct users toward particular resources. I’ve seen people use it to enforce a specific tone (“always respond in a friendly, encouraging way”) or to add guardrails (“never provide medical advice, always direct health questions to the school nurse”). This is worth experimenting with once you have a feel for how the AI responds to your content.
The code itself is structured to be readable if you’re curious. The keyword matching algorithm, the session management, and the AI prompt construction are all in separate, clearly labeled sections. I’m not saying you need to modify them, but if you’re the kind of person who wants to understand how things work under the hood, it’s there for you.
Connect and Continue
I built this because I kept seeing the same pattern across different organizations I work with: someone has a set of frequently asked questions, the answers exist somewhere, but the process of connecting people to those answers is still manual and repetitive. A full-featured support platform is overkill for most of these situations. A Google Sheet with some script behind it turned out to be just enough.
If you run into trouble getting it set up, have ideas for how it could work better, or just want to share how you’re using it, I’d like to hear from you. Reach out at licht.education@gmail.com.

Leave a comment