
Version note: Updated September 2026 for v3.1, which adds teacher pre-observation input. If you are already running v3.0.x, you do not need to make a new copy. See “Already running an earlier version?” below. A newer version with additional features is available through Compass Partners in Learning for partner districts. Everything described on this page is fully functional and actively used by a few partnering locations.
What and Why
If you are a principal or instructional coach doing classroom walk-throughs, you have probably been through some version of this cycle: create a Google Form with the Danielson components you want to track, submit it from your phone in the hallway, then manually pull the data together later when you want to share feedback or look at trends. It works. But every time you want to email the teacher a summary, generate a document for the file, or see patterns across your building, you are doing that work by hand.
There is a second problem sitting underneath that one, and it is the one v3.1 is built around. A ten minute walk-through shows you Domain 2 and Domain 3, the classroom environment and the instruction happening in front of you. Domains 1 and 4, planning and preparation and professional responsibilities, are mostly invisible from the back of the room. Most observers handle that by leaving those components off the form entirely or by asking about them in a hallway conversation afterward that never makes it into the record. Neither option is wrong, exactly, but both mean half the framework goes undocumented in the informal observation loop.
This tool is a Google Sheets-based web app that handles the walk-through process with a few meaningful improvements over a standard form. It gives you a mobile-friendly observation form branded to your school, automatic HTML-formatted emails to both the observer and the teacher, optional Google Doc generation for each observation, a dashboard for tracking patterns over time, and control over which Danielson components appear on your form. As of v3.1, it also lets teachers submit their own notes and artifacts for the components you cannot see during a visit, and merges that evidence into the observation record automatically. If you want to go further, there is an optional AI feedback feature that generates coaching suggestions based on the observation data, though that requires a separate API key and is entirely opt-in.
The audience here is building-level administrators and coaches who are already doing walk-throughs using the Danielson Framework and want a cleaner workflow without paying for a dedicated observation platform. This is not a full evaluation system, and it does not attempt to replace formal observation protocols that require rubric scoring, evidence documentation, or multi-observer calibration. It is a walk-through tool, designed to make the informal observation loop (observe, document, share, track) faster and more consistent. The teacher input feature follows that same scope. It is a way to collect context before a visit, not a self-evaluation instrument.
You will need a Google Workspace account to use this. The tool runs entirely within Google’s ecosystem, using Sheets as the backend, Apps Script as the engine, and a deployed web app as the form interface. There is no external hosting, no database, and no subscription. Two things worth noting before you start. First, a few districts have run into situations where their IT department’s email filtering blocks the automated notification emails. If that happens, the observations still save to the sheet and generate documents normally, but you may need to work with your tech team on the email piece. Second, the link each teacher receives for their input form is unauthenticated by design, which is what keeps the experience to one click with no separate login. Anyone holding that link can view and replace that teacher’s submission, so the links should be treated as private and not forwarded around.
Quick Look
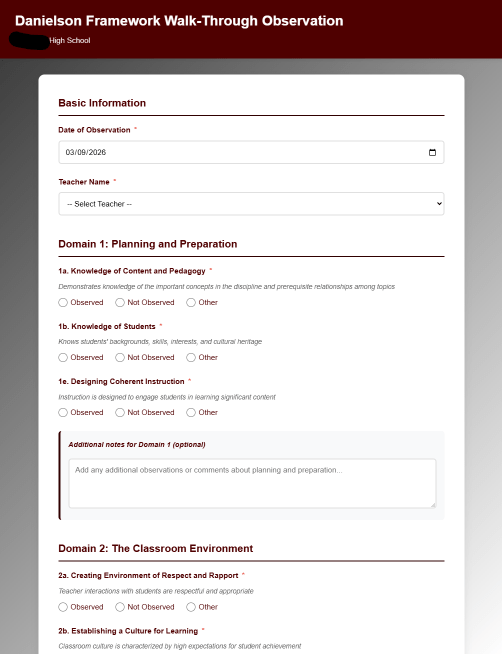
The form adapts to your school’s branding colors and name, configured from a simple settings tab in the spreadsheet.
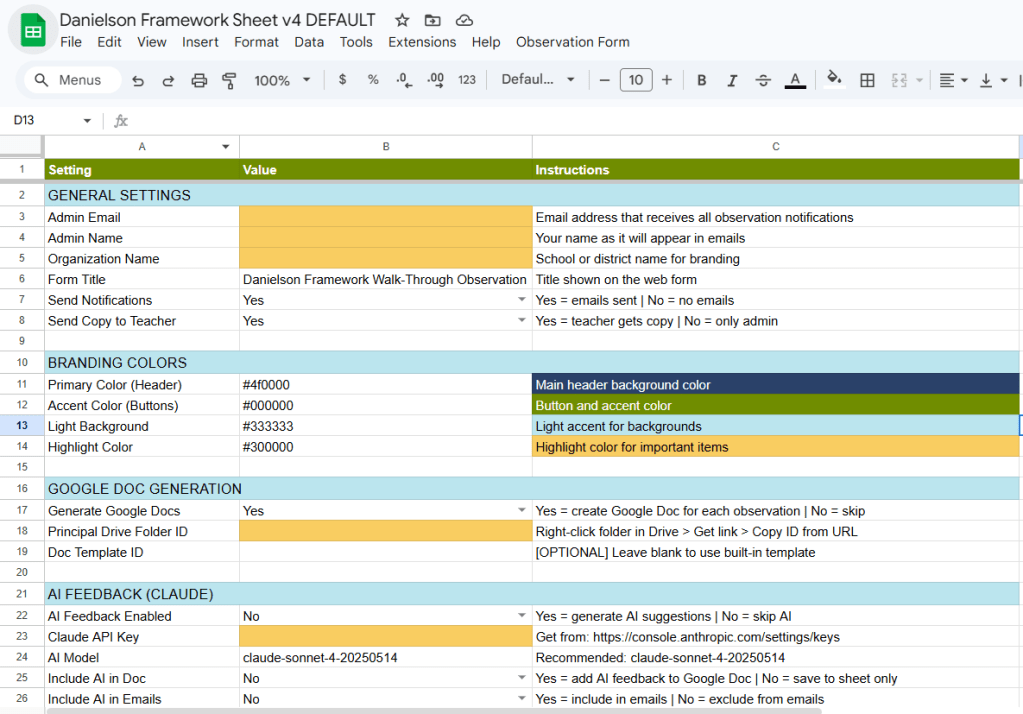
Everything you need to customize lives in the Config tab. Yellow cells are the ones that need your information before the tool will work.
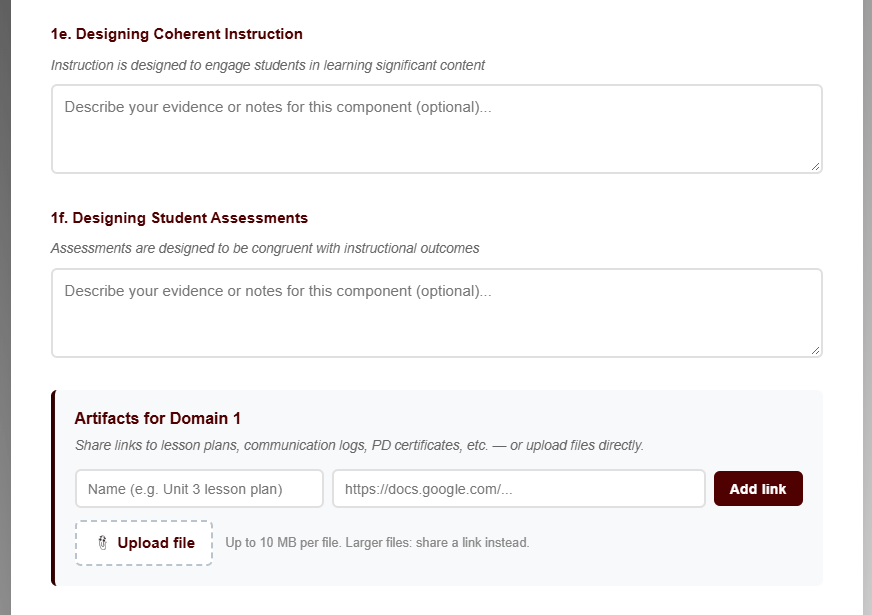
Teachers receive a link that opens a page in your branding, with one box per component you have opened to them and a place to attach links or upload files.
On observation day, a “Teacher input received” bar appears under the teacher’s name so you can skim their evidence before you start on Domains 2 and 3.
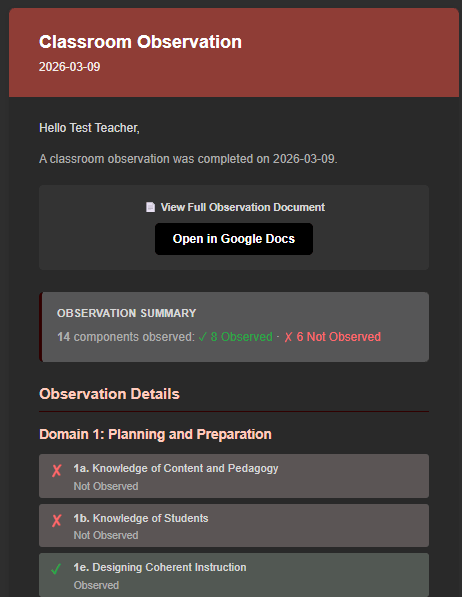
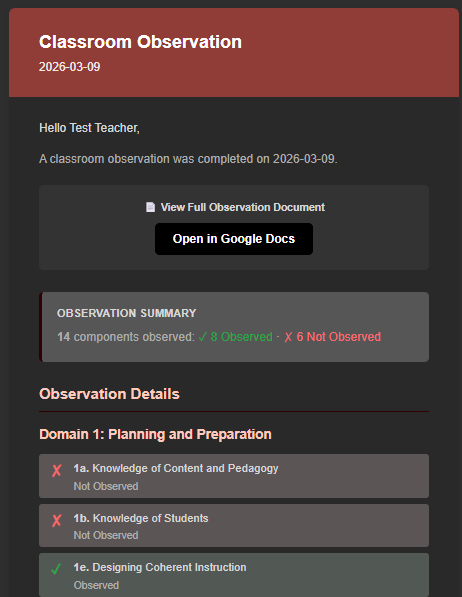
After each observation, the teacher receives a formatted email summarizing what was observed, now including their own submitted evidence, with an optional link to the full Google Doc.
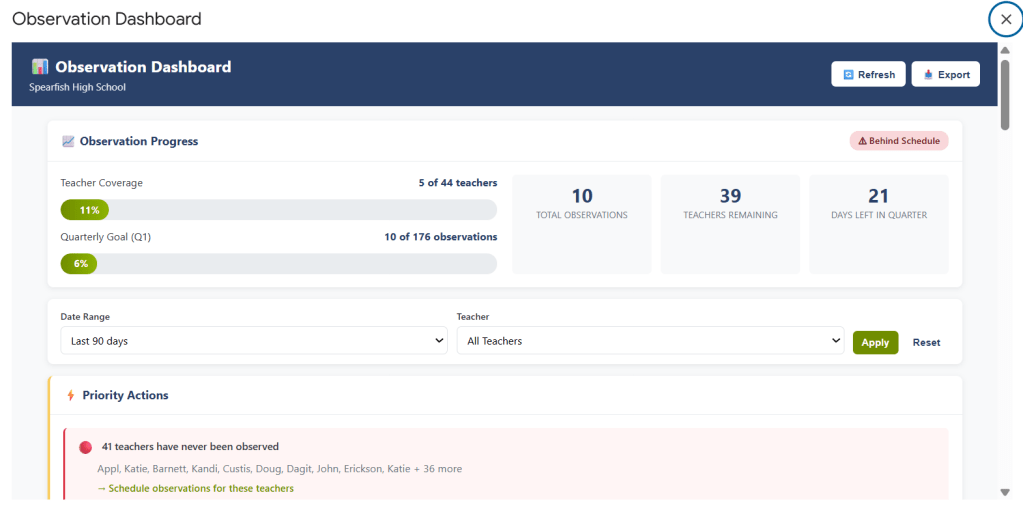
The built-in dashboard gives you a building-level view of observation coverage, component trends, and which teachers are due for a visit.
Get Started
When you click that link, Google will ask you to make a copy of the spreadsheet. This gives you your own independent version of the tool. Nothing you change in your copy affects the original, and nothing in the original will change your copy. You are the owner of your version, and you control who else can access it.
Your copy will include the spreadsheet with all its tabs (Config, Teachers, Questions, Observations, Teacher Input, Logs), the Apps Script code that powers the web app, and the HTML files for the form, the teacher input page, and the dashboard interfaces. All of it comes along automatically when you make the copy.
Already running an earlier version?
If you set this up before September 2026, do not make a new copy. You would lose your observation history. The v3.1 code is already in your script, so what you need is a new deployment version and one run of Setup. It takes about five minutes.
- In your spreadsheet, go to Extensions > Apps Script.
- Click Deploy > Manage deployments, click the pencil icon to edit, set Version to “New version,” and click Deploy. This keeps your existing web app URL, so any bookmarks your team has still work. Creating a brand new deployment also works, but it generates a new URL you would have to redistribute.
- Copy the web app URL from that deployment screen.
- Back in the spreadsheet, run Observation Form > Setup Spreadsheet. This is non-destructive. It adds the new tab, columns, and settings, and leaves your existing data alone. If the menu does not show the new items, reload the sheet first.
- Paste the URL into the Config tab, in the new Web App URL row at the bottom. Teacher links are built from this cell, so the feature will not work without it.
- Run Observation Form > Validate Setup. It will report how many components are open to teachers and warn you if the URL is missing.
Step 5 deserves a word of explanation, because it looks redundant. Apps Script has a built-in way of finding its own deployed URL, but it has been unreliable when called from the spreadsheet menu, which is the source of the “unable to open” behavior some principals ran into. Storing the URL in a Config cell removes the guesswork.
Walk Through It With Me
This setup has a few more steps than a typical copy-and-go sheet tool, because you are deploying a web app. That said, none of the steps are technically difficult. If you can fill in cells in a spreadsheet and click through a few menus, you can get this running. The whole process takes about 20 minutes the first time.
Step 1: Open Your Copy and Run Setup
After making your copy, you should see a spreadsheet with several tabs already created. Look for a custom menu at the top of the screen called “Observation Form.” If you do not see it right away, refresh the page. Google sometimes takes a moment to load custom menus.
Click Observation Form > Setup Spreadsheet. This will ensure all the sheets are properly configured and formatted. Google will ask you to authorize the script the first time you run it. This is the standard Apps Script authorization prompt, and it looks more alarming than it is. The script needs permission to read and write to your spreadsheet, send emails on your behalf, and create files in your Drive. Those are the core functions of the tool, and it will not do anything outside of what is described here. Click through the authorization, and the setup will complete.
At this point, you should see a confirmation dialog telling you setup is complete.
Step 2: Configure Your Settings
Go to the Config tab. This is where all the settings live, and the tab is organized into labeled sections. Focus on the General Settings section first. There are three cells highlighted in yellow that you need to update before anything else.
Admin Email is the email address where observation notifications will be sent, and it is also the reply-to address on the emails teachers receive. This should be the principal or lead observer’s email. Admin Name is the name that will appear in the footer of emails and documents. Organization Name is your school or district name, which shows up in the form header, emails, teacher-facing pages, and generated documents.
The other settings in this section control whether emails are sent at all and whether teachers receive a copy. Both default to “Yes,” which is what most buildings want.
If you already know how to find a Google Drive folder ID, you can skip ahead and set up the Principal Drive Folder ID now. Otherwise, continue through the next steps in order and come back to it later.
Step 3: Add Your Teachers
Go to the Teachers tab. You will see a couple of example rows highlighted in yellow. Delete those or replace them with your actual teachers. Each row needs a teacher name, their email address, and “Yes” in the Active column. The names you enter here are what will appear in the dropdown on the observation form, so use whatever format your building prefers.
You will also see three columns you do not need to touch: Link ID, Last Requested, and Last Submitted. The Link ID is generated the first time you send a teacher an input request, and the dates fill in on their own. Leave the Link ID alone once it exists, because it is what makes a teacher’s link work.
One thing worth knowing now rather than later: teacher submissions are matched by the exact name on this tab. If you rename a teacher after they have submitted, update their rows on the Teacher Input tab to match, or the merge will not find their evidence.
At this point, you should have at least one real teacher listed with Active set to “Yes.”
Step 4: Choose Your Danielson Components
Go to the Questions tab. Every Danielson Framework component across all four domains is listed here, and two columns control where each one shows up.
The Active column controls which components appear on your observation form. By default, the tool activates a subset of commonly observed components (all of Domain 2 and 3, plus selected items from Domains 1 and 4), but you can activate or deactivate any component by changing its Active value to “Yes” or “No.”
The Teacher Input column is new in v3.1, and it controls which components appear on the teacher’s form. After Setup runs, every Domain 1 and Domain 4 row is set to “Yes” and every Domain 2 and 3 row is set to “No.” The two columns are deliberately independent, so a component can be Yes in one and No in the other. The common arrangement is Active = No and Teacher Input = Yes for Domains 1 and 4, which means you observe what you can see and teachers supply what you cannot. Nothing forces that split, though. If your building wants teachers reflecting on 3b, or wants all four domains open on both sides, set the columns accordingly.
The Question Text and Description for each component are shown to teachers as the prompt for that note, so if you edit them, keep them teacher-readable.
You can preview which questions are active by clicking Observation Form > Preview Active Questions from the menu. Changes to either column take effect immediately, including on links you have already sent, because the teacher form reads the sheet each time it opens.
Step 5: Validate and Deploy
Before deploying, run Observation Form > Validate Setup to check that everything is configured correctly. The validator will tell you if any required fields are still set to the default “CHANGE-THIS” placeholder, whether you have teachers and questions active, how many components are open to teachers, and whether optional features are configured.
Once validation passes, deploy the web app:
- Go to Extensions > Apps Script to open the script editor
- Click Deploy > New deployment
- Under “Select type,” choose Web app
- Set “Execute as” to Me (your account)
- Set “Who has access” to Anyone (this is necessary for both the observation form and the teacher links to work on mobile devices without requiring a login)
- Click Deploy and copy the URL
That URL is your observation form. Bookmark it on your phone. You can also find it later by clicking Observation Form > View Form URL from the spreadsheet menu.
Step 6: Paste the URL Back Into Config
Return to the spreadsheet, scroll to the bottom of the Config tab, and paste that same URL into the Web App URL row. This is what teacher links are built from, and the request dialog will refuse to send without it.
At this point, you should be able to open the URL on your phone and see a branded form with your school name, your teacher list in the dropdown, and your active Danielson components.
Step 7: Test It Before Anyone Else Sees It
There are two built-in tests that exercise the whole flow without emailing a real teacher, and a third step that checks a real link end to end.
Start with Observation Form > Advanced > Test Teacher Input Flow. This runs the migration, confirms that invalid links are rejected, and saves a sample submission for a synthetic teacher named “John Smith,” who is not on your Teachers tab and therefore cannot be emailed by accident.
Then run Observation Form > Test Form Submission, which observes that same synthetic teacher. Check your admin email and, if you have Docs turned on, the generated document. Both should contain a Teacher-Submitted Evidence section with the test notes and a link. If the test email does not arrive, check your spam folder first. If it is not there either, your school’s email filtering may be blocking it. The observation data still saves to the spreadsheet regardless, so the tool remains functional.
Finally, test the real thing on yourself. Add yourself to the Teachers tab with your own email and Active set to “Yes,” then use Observation Form > Request Teacher Input, tick your own name, and send. Open the email, click through to the form, write a note, add a link, upload a small file, and submit. Confirm the file landed in Drive under Teacher Artifacts, that your row appears on the Teacher Input tab, and that reopening the link shows your answers pre-filled. Then open the observation form, pick yourself, and confirm the “Teacher input received” bar appears before you submit an observation. When you are satisfied, delete your test rows from the Teachers, Teacher Input, and Observations tabs, or just set yourself to Active = No.
Step 8: Send Your First Requests
Open Observation Form > Request Teacher Input. The dialog lists every active teacher who has an email address on the Teachers tab, with shortcuts for selecting all, none, or only those you have not yet asked. Tick the teachers you want to email, optionally set a due date (it appears in the email and the subject line), and optionally add a short message that gets quoted in the email as a note from you. Something like “I will be observing on October 1, please share by September 29” is usually enough context.
Each teacher receives a branded email from your organization name, with your admin address as the reply-to, containing a button and a plain link to their own form. The email lists which domains they are being asked about and includes your instructions text from Config.
The link is created the first time you send to a teacher and never changes after that, so you can resend freely. Sending again is the normal way to nudge someone. The dialog also shows, per teacher, when the last request went out, when they last submitted, and a status badge (Submitted, Superseded, or Used), along with a Copy link option if you would rather paste the link into a chat message than send another email.
Common First-Run Issues
“I don’t see the Observation Form menu.” Refresh the page. If it still does not appear, go to Extensions > Apps Script, then close the script editor and return to the spreadsheet. The menu should load.
“The authorization screen says this app isn’t verified.” This is normal for any Apps Script project that has not been submitted to Google for review. Since you own the script, you can safely proceed by clicking “Advanced” and then “Go to [project name].”
“Emails are not arriving.” Check spam first. If your district uses strict email filtering, the automated emails may be blocked. The observations still save to the sheet and generate documents. Work with your IT team if email delivery matters to your workflow.
“The form shows no teachers in the dropdown.” Make sure you have at least one teacher in the Teachers tab with Active set to “Yes” and that the name does not contain “EXAMPLE.”
“The request dialog says there is no web app URL.” Paste the deployment’s URL into the Web App URL row on the Config tab. See Step 6.
“A teacher’s link says it is not valid.” The Link ID in the URL does not match what is on the Teachers tab. Usually the link was truncated when it got forwarded, or the Link ID cell was edited by hand. Resend from the dialog or use Copy link.
“The teacher form shows no components.” No rows on the Questions tab have Teacher Input set to “Yes.” Run Setup Spreadsheet to seed Domains 1 and 4, or set the column yourself.
“A teacher’s upload was refused.” Files over 10 MB are rejected before upload. The form suggests sharing a link instead, which is often the better option for large artifacts anyway.
Make It Yours
Once the basic setup is working, there are several directions you can take the tool depending on what matters to your building.
Safe to Change Anytime
The branding colors in the Config tab affect the observation form, the teacher input form, the request emails, the notification emails, and the generated documents. If your school has specific brand colors, update the Primary Color, Accent Color, Light Background, and Highlight Color values using hex codes. The defaults are Compass Partners colors and will work fine if you do not have specific branding needs.
The active questions can be changed at any time, on either column. If your walk-through focus shifts mid-year, update the Active column and the form reflects the change immediately. No redeployment needed. The same is true of the Teacher Input column, including for links you have already sent.
The teacher-facing wording is yours to edit. Teacher Input Form Title sets the heading on the teacher form and the subject line of the request email, and Teacher Input Instructions is the paragraph that appears at the top of both. The defaults are serviceable, but a sentence in your own voice explaining why you are asking will do more for participation than anything else in this tool.
Teacher list updates also take effect immediately. Add or remove teachers as your staff changes.
Optional Features Worth Exploring
Google Doc generation creates a formatted document for each observation and saves it to a Drive folder you specify. To enable it, set “Generate Google Docs” to “Yes” in the Config tab and paste the ID of your target Drive folder. (To get a folder ID, right-click the folder in Google Drive, click “Get link,” and copy the long string of characters from the URL.) The tool will also share each document with the teacher automatically. When a teacher has submitted input, the document includes a Teacher-Submitted Evidence section after the component table, organized by domain, with their notes and clickable artifact links.
That same folder is where teacher uploads land, under Teacher Artifacts and then a subfolder per teacher. If you have not set a folder ID, the script creates an Observation Teacher Artifacts folder in the deploying account’s Drive. Either way, the files are owned by your account, which means they stay with the school rather than with an individual teacher.
Include Teacher Input in Emails controls whether the evidence section appears in the notification emails or stays in the document and the sheet only. Some buildings prefer the lighter email and the fuller document.
AI feedback uses the Claude API to generate coaching suggestions based on the observation data. This is entirely optional and requires a Claude API key from Anthropic. If you enable it, the AI-generated feedback can be included in the Google Doc, the notification emails, or both. As of v3.1, the teacher’s notes and artifact names are passed into the prompt as teacher-provided evidence, so the suggestions can draw on both sides of the picture rather than just what you recorded. The feedback is clearly labeled as AI-generated and should always be reviewed before acting on it.
The dashboard is accessible from the spreadsheet menu under Observation Form > View Dashboard. It shows observation progress toward quarterly goals, teacher coverage, component-level strengths and growth areas, and priority actions like which teachers have not been observed recently. It works with whatever data is in your Observations sheet and requires no additional setup.
Turning teacher input off is a single setting. Set Teacher Input Enabled to “No” and existing links show a message saying the feature is turned off, the request dialog stops sending, and observations ignore the Teacher Input tab entirely. If you want to remove one teacher’s submission, delete its row on the Teacher Input tab and their next visit to the link starts blank.
If You Want to Go Further
The entire codebase is in the Apps Script editor. The main script file handles form submission, teacher input, email generation, document creation, and AI integration. The HTML files control the observation form, the teacher input page, and the dashboard. If you are comfortable reading Google Apps Script (which is essentially JavaScript), you can modify the AI prompt, adjust email templates, change the dashboard calculations, or add features. That said, if you are not sure what a piece of code does, it is better to leave it alone. The tool works well out of the box, and the Config tab covers most use cases without touching code.
Connect and Continue
This tool started as a way to give our partner districts something better than a Google Form for walk-throughs without asking them to buy an observation platform. The teacher input feature came out of a simpler observation than it probably sounds: the components that were hardest to document were the ones only the teacher could speak to, and there was no reason the tool could not just ask them. Whether that changes the quality of the conversation afterward is something I am still watching.
If you run into issues during setup, have questions about configuring a specific feature, or have ideas for improvements, I would be glad to hear from you. Reach out at licht.education@gmail.com.
Version note: This is the open version (v3.0.3) of the tool. A newer version with additional features is available through Compass Partners in Learning for partner districts. Everything described on this page is fully functional and actively used by a few partnering locations.

