
The Scope and Sequence Builder is released under a Creative Commons Attribution 4.0 license, which means you’re welcome to copy it, modify it, and share it with colleagues as long as you keep an attribution back to the original. It’s provided as-is and is not a substitute for your team’s professional judgment about what to teach and when; it’s a structure for applying that judgment, not a replacement for it. Everything stays in your own Google Drive. The script runs inside your workbook on your own Google account, and no data is sent anywhere else. You are responsible for ensuring appropriate use of this tool.
Every curriculum team faces the same question at the start of a year: given all the standards we’re responsible for, when should we teach each one? The conversation tends to go one of three ways. It takes weeks, it ends in a compromise document nobody fully owns, or it gets delegated to whoever has the loudest opinion about what should come first. The standards being sequenced are usually real, the judgments behind the sequence are often sound, and the map that comes out of the process is typically fine. What’s missing is a structured way to hold all of the considerations at once, make the trade-offs visible, and revise the plan without starting over.
The Scope and Sequence Builder is a free, open Google Sheet that helps teams get from a list of standards to a year-long pacing map. You paste in the standards you work with, define the criteria that matter to your team, score each standard on those criteria, and the tool produces a suggested map that distributes them across your year by term, then by month, then by week within each month. A separate Analysis tab flags the standards that are safest to cut if time runs short, the extension candidates worth reaching for if time allows, and any gaps where the pacing violates a prerequisite relationship or one term is overloaded compared to another.
The tool works the same way for fifteen standards or three hundred. It fits a grade-level team, a single-subject teacher planning a course, a district coordinator mapping multiple grades, a private school designing its own sequence, or a homeschool parent planning a year around whatever standards they care about.
A few things are worth being clear about up front. This is not a curriculum-writing tool. It doesn’t generate lesson plans, unit descriptions, or assessments. It assumes you already know which standards you’re working with and takes those as the starting point. It’s also not AI. Every placement decision is the result of transparent math: a weighted average, a sort order, a capacity check. The same inputs always produce the same output, and every placement is recorded with a reason on the output tab. If you don’t like where a standard landed, you can trace the reasoning and adjust your inputs accordingly. That auditability is the point.
What it looks like
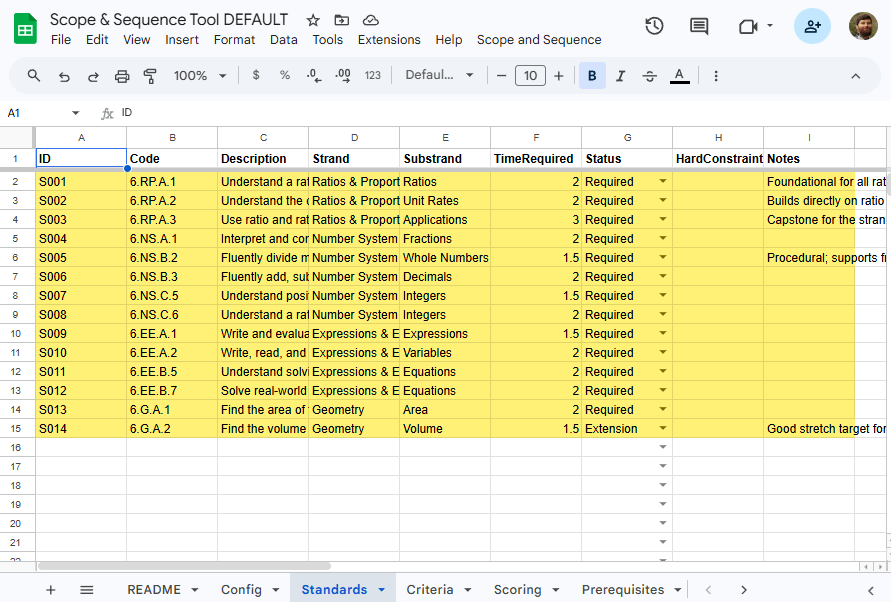
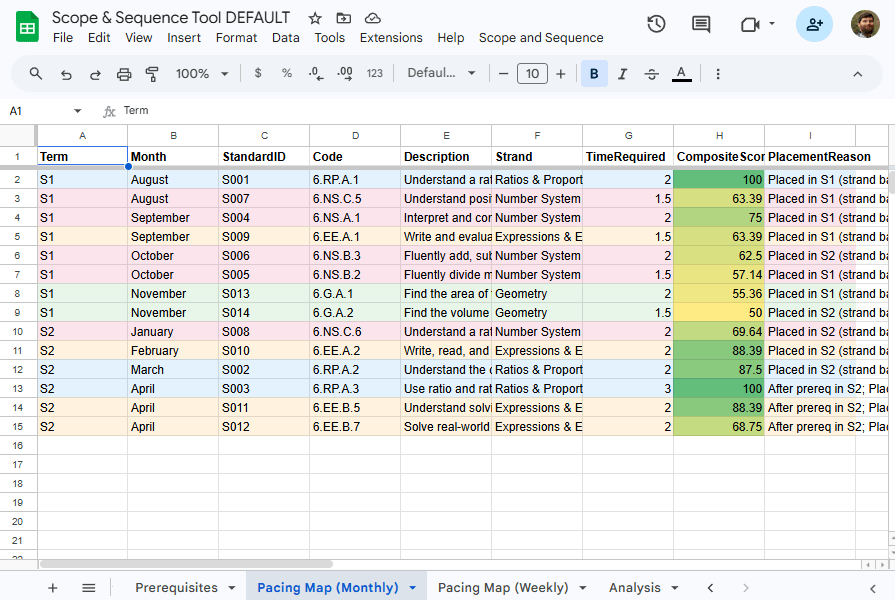
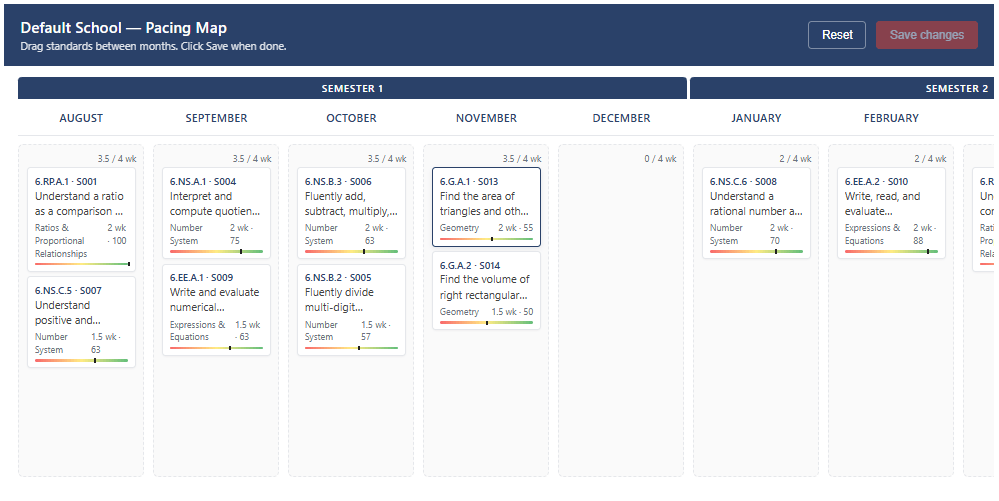
The Standards tab is where you enter your inputs. The Pacing Map tab is what the tool produces when you run Build Pacing Map. A drag-and-drop interface is available for it as well after generating.
Get started
The tool ships as a Google Sheet template that you copy into your own Drive.
Making a copy gives you your own independent workbook. Nothing you do affects the original template, and no data flows anywhere outside your own Google account. If you’re on a Google Workspace account through your school or district, the copy lives in your tenant and stays there.
Once you’ve made the copy, rename it to something your team will recognize (“Scope and Sequence — Grade 6 Math 2026–27” is the kind of naming that works well), save it somewhere your team can find, and move on to the setup guide below.
Setup guide
The first time you open your copy of the workbook, you’ll see a custom menu in the menu bar called Scope and Sequence. The first time you click any item on that menu, Google Sheets will ask you to authorize the script. This is standard for any sheet-bound tool and not specific to this one. Google is asking whether you trust the script attached to your sheet to run with your Drive permissions. Review the prompt, approve, and you’re set for future runs.
- Run the setup flow. Click Scope and Sequence → Setup for my school. The tool will prompt you for a school or organization name, a term structure (Semester, Trimester, or Quarter), the first instructional month of your school year, and an optional primary color for headers and accents. Anything you enter here can be edited later from the Config tab, so it’s fine to make your best guess and adjust as you learn what you want.
- Read the README tab. The README inside the workbook is a two-minute overview of everything the tool does and where to find it. If you want a map of the territory before you start entering data, that’s where it lives.
- Load sample data (optional but recommended). Click Scope and Sequence → Load sample data to populate the workbook with fourteen sixth-grade Common Core math standards, a complete scoring matrix, and a handful of prerequisite relationships. Every cell the sample loader writes is highlighted yellow so you can tell demo data from your own. Click Build Pacing Map after loading samples to see the algorithm running on a realistic dataset before you commit to entering your own standards. When you’re ready to start fresh, Scope and Sequence → Reset / clear data will clear the demo.
- Enter your standards. On the Standards tab, each row is one standard. You’ll need a Code (your identifier, like
6.RP.A.1), a Description, a Strand (a high-level grouping like “Algebra” or “Reading Literature”), a TimeRequired (your team’s estimate of weeks needed, with fractions like 0.5 allowed), and a Status (Required, Optional, Extension, or Cut). Leave the ID column blank. When you’re done, click Scope and Sequence → Auto-generate IDs and the tool will fill them in. - Review your criteria. The Criteria tab comes preloaded with four defaults drawn from the R.E.A.L. framework developed by Doug Reeves, Larry Ainsworth, and Ted Horrell’s team in Shelby County, Tennessee: Readiness, Endurance, Assessed, and Leverage. Two additional criteria (Student Interest, Equity and Cultural Relevance) ship inactive for teams that want them. Adjust the MetaWeights on each criterion to reflect what your team actually values. A team preparing students for a high-stakes state test might weight Assessed higher. A team focused on preparing students for the next grade might push Readiness up. There are no wrong answers here; the weights express your team’s judgment.
- Score your standards. Click Scope and Sequence → Refresh Scoring Matrix and the Scoring tab will populate with a row per standard and a column per active criterion. Every cell defaults to the midpoint of your scoring range and is highlighted in cream to show you haven’t reviewed it. Scoring is the part of the process where your team’s values surface most visibly, and it’s often more productive to do this together than to split it up. Project the workbook on a screen, score as a group, and let the disagreements become the conversation.
- Define prerequisites (optional). On the Prerequisites tab, add rows for pairs of standards where sequencing genuinely matters. Five to ten well-chosen prerequisite relationships will do more for your map than fifty weak ones. Focus on the ones that would actually cause a problem if reversed.
- Build the pacing map. Click Scope and Sequence → Build Pacing Map. The algorithm runs nine phases internally, and for a typical dataset of thirty to a hundred standards it finishes in a second or two. Three tabs populate: Pacing Map (Monthly), Pacing Map (Weekly), and Analysis. Start with the Monthly map. If something landed somewhere that doesn’t match your team’s intuition, the PlacementReason column in each row explains why.
At this point you have a working pacing map. You can iterate by revisiting the Criteria, Scoring, or Prerequisites tabs and running Build Pacing Map again. Because the algorithm is deterministic, the changes you make have predictable effects on the result. Most teams go through three or four rounds before they land on a map that feels right.
Make it yours
Once the basic map is working, most of what’s worth adjusting lives on the Config tab. If your school year has more or fewer than nine instructional months, change totalMonths. If you prefer a 1–3 or 1–10 scoring scale instead of the default 1–5, change compositeScoreMin and compositeScoreMax (and run Refresh Scoring Matrix afterward). If the Analysis tab’s cut-candidate list feels too aggressive or too conservative, tune cutThreshold. If you want your school’s colors and logo to show up in the drag-and-drop editor and exported Google Docs, those settings live on Config too.
The Criteria tab is where the most interesting customization happens. You can rewrite the default descriptions to match your team’s language, activate the two criteria that ship inactive, or add entirely new criteria that reflect priorities unique to your context. A middle school team whose priorities are shaped by students’ entry-level reading data might add a “Foundational Literacy” criterion. A private school might add an “Alignment with Core Values” criterion. The tool doesn’t prescribe what matters; it provides a structure for applying what you’ve decided matters.
A couple of features are worth knowing about once you’re comfortable with the basic workflow. The drag-and-drop editor (Scope and Sequence → Open Drag-and-Drop Editor) lets you override the algorithm’s placements by dragging standards between months. When you save those changes, they’re written to the Monthly map with a PlacementReason of “Manually placed via dialog.” The Weekly and Analysis tabs won’t refresh until you run Build Pacing Map again, and the dialog shows a reminder when this happens. And if you need a printable version for a team meeting or an administrative review, Scope and Sequence → Export Printable View generates a fresh Google Doc you can share or download as a PDF.
A note on the approach
A question I’ve gotten from curriculum coordinators evaluating this tool is whether it uses AI. It doesn’t, and that’s deliberate. AI-based pacing tools have emerged in the last few years, and they have a place in this kind of work. But for the specific task of deciding curriculum priorities, a deterministic tool has some real advantages. Administrators, boards, and accreditors can see exactly why each decision was made. Small changes to the inputs produce predictable changes to the output, which is what lets a team learn its way toward a map that fits. And teams tend to develop genuine ownership of a pacing map when they understand how it was built, in a way that’s harder when a black box sits between their judgment and the result.
The tool is built to make the team’s judgment the center of the process, not to replace it. The algorithm handles the bookkeeping. The team handles the thinking.
Connect and continue
This tool is free and open. If you use it and run into something that should work differently, or if you have ideas for how it could be more useful in your context, I’d like to hear about it. Feedback from actual classroom and curriculum team use is what moves the tool forward more than anything else.
You can reach me at licht.education@gmail.com with questions, bug reports, or suggestions. For other tools and articles, everything lives at bradylicht.com.
